Bread baking 101
April 12, 2010
See what I made in my Bread Baking 101 class at the School of Culinary Arts at Kendall college!
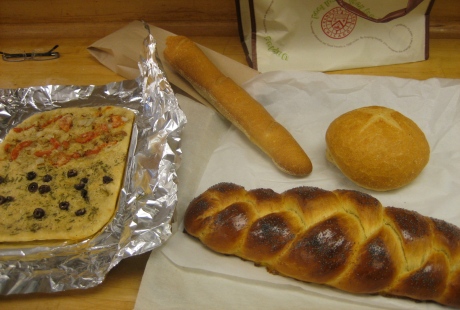
There is the focaccia bread on the left, with two different toppings. Right next to it, towards the top of the picture, is the nice crusty baguette (with one end broken off because I had to have it hot and slathered with European butter and could not wait till after I take the picture.) The baguette is followed by the sourdough bread roll, and. finally, at the bottom right, the star of the show, the braided challah bread.
They were all fairly easy to make and taste, oh, so delicious. I am surely going to be making them again at home one by one. I will write up the recipes as I go along, for posterity. In case there is special interest in any particular bread, let me know and I have will have a go at that one first.
A big thanks to S for telling me about this class and for being my very excited class partner.
Vegetable Daliya
April 10, 2010
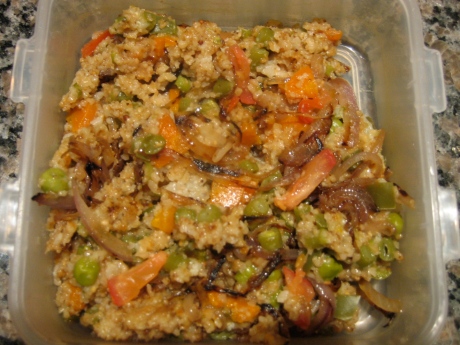
I had a rather “delicate” stomach when I was growing up. And every time I was going through one of the bouts of stomach upsets after eating outside food and/or drink, my mother used to feed me plain khichdi (a mush of rice and daal cooked together) or daliya (broken wheat cereal, which she made sweet with milk). So much so that I started to associate these two dishes with being sick. Then one day for breakfast, at my best friends place in Ludhiana, I had a dish which Aunty called daliya, but it was really different from the sweet milky dish I was used to having. This was savory, full of vegetables and rather dry in form. My eyes were opened and I started to have a new respect for wheat as a grain. I now have vegetable daliya as breakfast, but also as a quick, week night meal.
Ingredients
1 cup broken wheat (daliya) – this is different from bulgur in the sense that it is not pre-cooked. It is available in Indian grocery stores.
2 cups water
Oil
1 tsp cumin seeds (jeera)
one small piece ginger
2 green chillies
For vegetables, I use whatever I have at hand. Pretty much anything that softens in one whistle in the pressure cooker is fair game. This time I used the following.
1 carrot
1 small capsicum/green bell pepper
a handful of green beans
a few florets cauliflower
about 1/4 cup peas
Salt and pepper to taste
Optional:
1 small onion
1 small tomato
Method
Grate ginger and mince green chillies.
Chop all the vegetables (except the onion and tomato) to about an even dice. I keep the cauliflower florets a little bigger as otherwise they tend to turn to mush
Dry roast the daliya till it starts to give off the characteristic wheat aroma. Make sure that you stir it intermittently as otherwise the side touching the pan becomes really dark and starts to taste a little burnt. You want the whole thing to evenly turn a shade or two darker.
Meanwhile, in a pressure cooker, heat a little oil. Add the jeera seeds and once they splutter, add grated ginger and minced green chillies.
Once those brown a little bit, add the diced vegetables and stir for a few minutes.
Add the roasted daliya and water and salt. You can also add black pepper if you so wish though I didn’t as I had put enough green chillies for my taste.
Close the pressure cooker and heat till the pressure develops. At this point, reduce the heat to low and cook in pressure for ten minutes.
While this is cooking, you could carmelize some thin sliced onions in very little oil. Make sure you don’t stir the onions too much while caramelizing them so that they brown ‘attractively’. I usually like to add onion and tomatoes on top if I am making the daliya for dinner, to add a rich earthy flavor, but not if it is for breakfast, as then I like the lighter version.
When you open the pressure cooker, gently fluff the daliya and spread the caramelized onions on top.
In the same pan that you caramelized the onions, you may quickly heat some diced tomatoes, not to cook them, but just till they are barely hot and spread them over the daliya as well. If you don’t want to add tomatoes, a squeeze of lemon would be a good addition as well.
Serve hot and enjoy!
Mathri
April 9, 2010
The thought of mathri transports me to the halls and laws on Sarojini Bhawan where my girlfriends and I spent many winter afternoons lounging about and feasting on the mathri and achaar sent by one sweet mom or another. That, along with Mahesh Ji’s chai, highly sweet and kadi, the kind I would not drink today, were the stuff our sun-touched days were made of. We all treasure those memories so much that even our e-group is called mathri-achaar!
Then, after I got married to this guy from Rajasthan, I got to taste the savory heaven that is MIL’s mathri. Whenever she is visiting, she makes a small batch, despite my loud protestations of not wanting to eat deep-fried foods, but then somehow, that small batch vanishes surprisingly fast at the hands of DH and yours truly. MIL only smiles knowingly.
So when Pink God posted a recipe from Nani ji for making mathri, I could not resist and wanted to make some too. But I also wanted the taste that MIL’s mathri has. So I called MIL and followed her recipe instead (which is fairly close to what Anjana posted with small differences)
Ingredients
3/4 cup whole wheat flour
1/2 cup maida (all purpose flour)
1/4 cup sooji (semolina)
1/4 cup ghee (clarified butter)
about a 1/4 cup warm water for dough
salt to taste
1/2 tsp ajwain (carom seeds)
Oil for frying
Method
In a parat (wide, deep plate), mix all the flours, salt and ajwain.
Heat the ghee a little bit if it is solid and then add it to the parat.
Rub this mixture with your hands for a good ten to fifteen minutes. The fat should be very well incorporated with the flour. This step is very important as this is what makes the mathri khasta, or flakey.
Make dough with a small amount of lukewarm water. The dough should not be soft.
Divide the dough into small balls, and using your rolling pin (belan), roll out small roundels.
With a fork, pierce each roundel multiple times. This ensure that the mathris will not puff when you fry them in oil. I think if the dough is really tight, that should anyway not happen, but I did this step anyway.
Heat oil and reduce the heat to medium low. Fry the mathris in batches of 5 or 6. Do not overcrowd them in the pan. Also, frying on medium low is very important. You don’t want to fry the mathris on high heat as then they will quickly brown on the outside but will not be cooked from the inside.
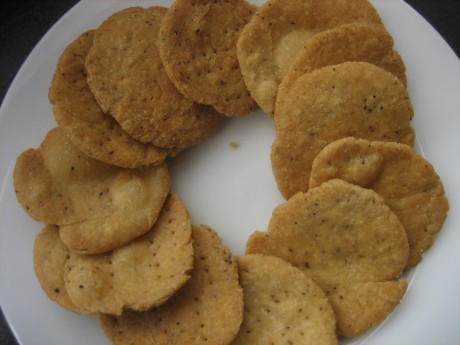
For me each batch of mathri took about 8 to 10 minutes and my mathris did not change color too much. These were dark initially because of the partial use of whole wheat flour instead of maida. If you want to further darken them, then you could use Anjana’s technique of raising the temperature of the oil towards the end and then bringing it down before putting in the next batch. With my glass top cooking surface, I am not able to quickly change the temperature so I did not do that. I also liked the color that my mathris came out to be in any case so it worked out.
The resulting mathris were approved by DH who is a mathri purist and used to only like the ones that his Mom made. We enjoyed them with home made lemon and mango pickles. There is something about mathri-achaar, I tell ya… 🙂
Daring Bakers: Orange Tian
March 27, 2010
I have been a part of the Daring Bakers for 3 months now. It is rather well-established community of, ahem, daring bakers, which I am loving being a part of. There are monthly challenges, hosted by different members of the community, which really challenge the bakers to stretch their culinary skills and learn many new things along the way. At least that is true for me. I am guessing people like macaron-goddess Meeta, who have been a part of Daring Bakers for a number of years might find the challenges easy by now, but I still have a long way to go before I reach that point.
After trying my hand at making Italian desserts Cannoli and Tiramisu past two months, this month I got to learn a French dessert as well called the Tian. Tian is essentially a layered casserole dish, mostly savory, but lately it has been interpreted to be sweet as well. This recipe of the Orange Tian I followed for the 2010 March Daring Baker’s challenge was hosted by Jennifer of Chocolate Shavings. She chose Orange Tian as the challenge for this month, based on a recipe from Alain Ducasse’s Cooking School in Paris. The challenges usually require us to follow certain form but still allow for experimentation with and creation of new flavor combination but for this recipe, as with the two before, I decided to stick with what the hostess had provided, preferring safe steering over exciting action. I felt that there will be plenty of time for creative action in the time to come and even being able to create the dish as it was supposed to be was rather exciting for me.
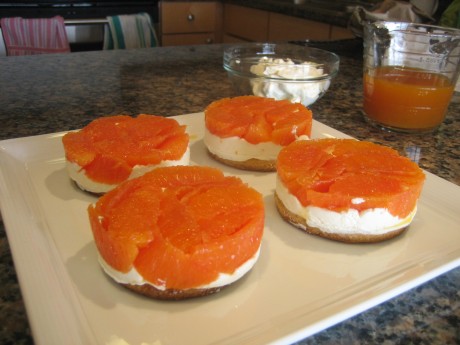
As is the case with most delectable desserts, there were a number of parts to the tian which were then assembled together as a final step. The base of the dessert is made of pâte sablée, which is a rich and crumbly French pastry crust. I made the dough for mathri (recipe forthcoming) in the morning and when I was making the dough for the pâte sablée later that day I realized that how similar in texture the two doughs were because of similar flour to fat ratios. The fat that makes the mathri flaky also makes the pâte sablée crumbly. This base is spread with some home made marmalade. The next layer is flavored whipped cream and the top layer is the orange segments soaked in caramel sauce. The interesting part about this dessert is that it is constructed upside down and then over turned for a super neat presentation. I don’t think it is possible to make this neat of a tian without doing the upside down flip.
Pâte Sablée
1 and 5/8 cup all purpose flour
1/3 tsp salt
1 tsp baking powder
7 tbsps cold butter cut in cubes
2 egg yolks at room tempereture
6 tbsps granulated sugar
1/2 tsp vanilla extract
The recipe asked for a food processor but I don’t have one so I just used my hands to make the dough for the pâte sablée. I am guessing it might turn out better in the food processor given that the butter doesn’t melt faster due to the heat of the hands but the result for me was rather good as well.
I don’t usually sift the flour but if you feel that your flour is not very fine, you could sift it with the salt and the baking powder.
Then the idea is to cut the butter in the flour till the fat is well distributed among the flour particles. Try not to work the dough at this stage too much in any one spot in order to keep the butter fairly cold.
In another bowl, mix the rest of the ingredients with a whisk or hand mixer till the egg yolks turn pale and the wet ingredients are well mixed together.
Pour the wet ingredients into the the dry ones and make a dough with it. The recipe said that I might need to add a couple of drops of water to get the dough together but mine was a rather thirsty dough and I think I must have added at least a quarter cup of water, perhaps a little more before the dough came together as a homogeneous ball.
This ball then needs to rest in the refrigerator for 30 minutes covered by a plastic wrap after which it will be ready to be rolled to about a quarter inch thickness, cut into desired shapes, placed on a cookie sheet lined with parchment paper and baked at 350 degree F for about 20 minutes.
In order to cut the pâte sablée into the desired shapes, I got a set of 4 english muffing rings from Sur La Table which worked out really well as the base to assemble the tian as well.
Orange Marmalade
1 large navel orange
1/4 to 1/2 cup granulated sugar
1/2 cup freshly pressed orange juice (about the juice of two medium size navel oranges)
5 gms pectin
Slice the orange into fine slices and put the slices in a pot with cold water. Bring the water to a simmer and blanch the slices for about 10 minutes. Drain the water and repeat the blanching procedure two more times. This process is done to ensure that any bitterness in the orange peel is drained away. Once blanched, drain the slices and let them cool.
Once they are cool enough to handle, process the orange slices in a blender or finally chop them with a knife if you would prefer.
Use about the same weight of sugar as the orange slices. I didn’t want my marmalade too sweet so I used a little less sugar.
In a pot, cook the minced orange along with the sugar, orange juice and pectin till it reaches jam consistency (about 10-15 minutes). Don’t wait for it to get really jammy because it will set as it cools as well. Mine ended up being too thick and then it was hard to fold it into the whipped cream.
Orange Segments
8 navel oranges
Segment 8 oranges as shown in this video
Retain the juice along with the segments
Caramel Sauce
1 cup granulated sugar (here again, I used a little less sugar than recommended without any worsening of the final taste)
1.5 cups orange juice (preferably at room temperature)
This was my first time making caramel sauce it was so fascinating to see how sugar behaves under duress (higher temperature, that is). Heat the sugar on medium heat till it starts to bubble and froth.
Slowly add the orange juice and remove from it when it starts boiling.
Pour half of this sauce over the orange segments and keep them in the fridge overnight.
Reserve the other half which you can thicken over heat (till it coats the back of a stirring spoon) and pour over the finished tians as a final touch.
Stabilized Whipped Cream
3 tablespoons of hot water
1 tsp gelatin
1 cup heavy whipping cream
1 tbsp confectioner’s sugar
1 tbsp orange marmalade
Dissolve the gelatin in hot water and let it come to room temperature while you whip the cream.
In a chilled bowl, whip the chilled cream with chilled beaters for about a minute on low speed.
Add the sugar and continue whipping till the beaters start to leave non-lasting trails in the cream.
Add the cooled gelatin slowly while continuing to beat the cream.
Whip till the cream forms soft peaks.
Fold in the orange marmalade.
Assembling the Orange Tian
Drain the orange segments on a kitchen towel.
Line a cookie sheet with parchment paper and place the 4 rings or any other shapes of your choosing on it. (as long as they match the shape that you cut the pâte sablée in)
Arrange the orange segments at the base of each ring in a pretty fashion. Remember that this is going to be top part of your dessert.
Spoon in a couple of tablespoons of whipped cream into each ring and spread it out evenly.
Spread some marmalade on the pâte sablée and invert the pâte sablée on the ring (marmalade side down)
Freeze the dessert for 10 minutes
Invert the cookie sheet on another plate of similar size.
Remove the ring from the first tian. Admire the fruit of your labor. You must agree that it looks really pretty.
Continue to remove the rings. They are ready to reused at this point if you would like to make more tians. The ingredients are enough for at least six tians.
How wonderful to have such a light and refreshing dessert and coffee in the fading spring sunlight.
How fun it is…
March 24, 2010
.. to receive happy packages from a special friend.
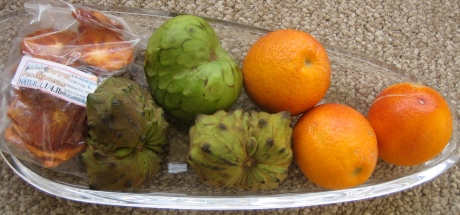
Thanks Anjana! The cherimoyas, blood oranges and dried persimmons were delicious and brought summer a little early to Chicago. 🙂
Polenta pizza with basil and buffalo mozzarella
March 23, 2010
My friends have often heard from me how I am always so interested in increasing the variety of foods in my diet. This is true especially of grains. Where I grew up, in the Punjabi heartland, we ate wheat as our staple food and when we said staple, we really meant it. Wheat was eaten three times a day as phulkas, parathas and pooris. It was incorporated in snacks as mathri and in desserts as halwa. Granted there were other grains that we ate some times. I mean nothing could be more Punjabi than saron da saag te makki di roti, and Sunday afternoons were incomplete without rajma chaval (kidney beans with rice). But, all considered, it was really Team Wheat all the way. Anyway, so lately, now that I am the mistress of my kitchen in the true sense, I try to adhere to a mixed grain diet on a regular basis to ensure that we get a spectrum of nutrients and not just certain sub-sections.
One of the grains that I like to use is corn. I am aware that Michael Pollan has pointed out that it is in half of the bulk of the supermarket inventory, but I like it in the form of polenta (which is essentially a savory mush, mostly made from corn meal) as it is whole grail and is not a highly processed form of corn. Also, since I use many other grains in my diet now such as oats, barley, pearl millet, quinoa, shama millet etc., I actually feel good about eating a little bit of maize as well. (There, I defended Zea Mays)
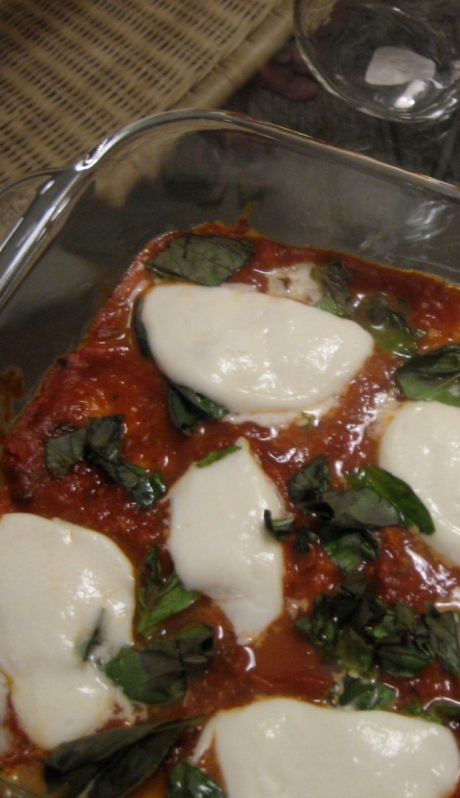
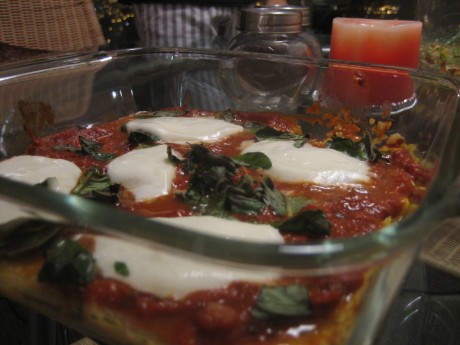
Polenta originates in Italy and the dish that I am telling you about today has been given a doubly hearty Italian flavor by using polenta as a base for Neapolitan style pizza with rich marinara sauce, basil and, the star of the show, buffalo mozzarella. And, as my dear little sis would love to know, this is a gluten-free dish.
Serves 2
Ingredients
For the base:
3/4 cup cornmeal (I use the coarse ground yellow variety)
2 1/2 cup water
Salt and black pepper
1 tbsp olive oil
Some dried herbs like oregano, thyme and/or rosemary (optional)
2 tbsps grated cheese like parmigiano reggiano (optional)
Toppings:
3/4 cup marinara sauce (or any other tomato based sauce. I sometime make some at home but for this time, I used a wild mushroom pasta sauce which was easy and delicious)
4 oz buffalo mozzarella
a handful of fresh basil leaves
Method
Heat water. Once it comes to a rolling boil, add corn meal to it and stir occasionally till it thickens. If you are using dried herbs, add them at this time as well.
You will have to stir more, almost continuously, towards the end. Be careful not to splatter yourself with polenta as it starts to thicken.
Once it becomes a little hard to stir it, it is time to take the polenta off the heat. At this point, stir in the olive oil and grated cheese (if using), and season it will salt and pepper.
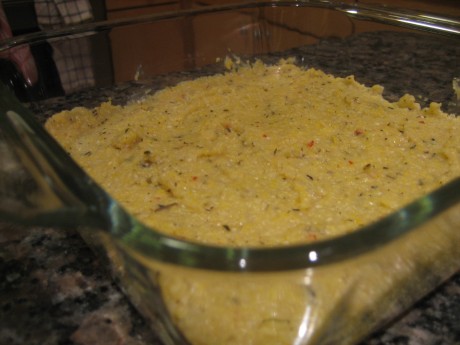
Pour the polenta into greased baking pan or an ungreased pyrex dish and spread it out with a spoon so that the top is somewhat even. (A thickness of 1/2 inch is good. I kept this pizza thin because of the delicate toppings. When I am making it with hearty toppings such as onions and green peppers, I keep it a little thicker.)
Keep it to cool and set in the refrigerator for at least a couple of hours. I usually make it the night before I need to make it and keep it in the fridge till I use it the next day.
Preheat the oven to 400 F
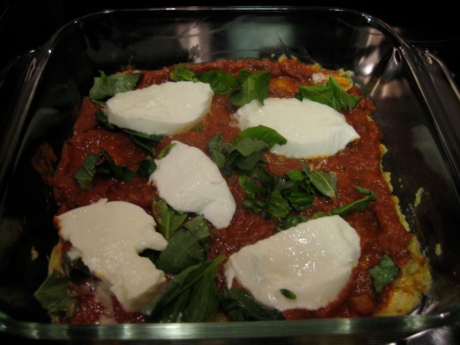
Spread the marinara sauce thickly on the pizza and spread out the basil leaves and slices of buffalo mozarella on top of the polenta pizza base.
Bake in the pre-heated oven for 12-15 minutes, till the cheese has softened and the polenta is heated through.
Your delicious polenta pizza is ready to be devoured. You can use the same method to make the pizza for any other toppings of your preference. Enjoy!
Muhammara – an experiment
March 13, 2010
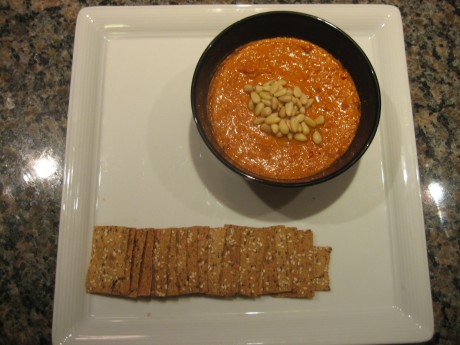
One of my dear friends, who blogs at Baking at Midnight, posted an intriguing recipe a couple of days ago. It was a Turkish dip called the Muhammara. I had never heard about this dip before though I had had many delicious Turkish ‘delights’ at Anjana’s place after they came back from their vacation in Turkey. Somehow the thought of melding the flavors of caramelized onion, sweetness of the red bell pepper and the earthiness of walnuts sounded really appetizing.
When I read through the recipe, it reminded of certain other red pepper dips, usually with garlic, like the one that Emeril makes. Now, I am not usually a big Emeril fan, but I wanted to try the Muhammara with roasting the onion and the red bell pepper instead of sauteing them. I felt that it might enhance the flavors. But, given my rather undeveloped culinary intuition, I was not entirely sure. A scientist by training, what do I do? I plan an experiment. That’s right, a taste experiment.
The Experiment
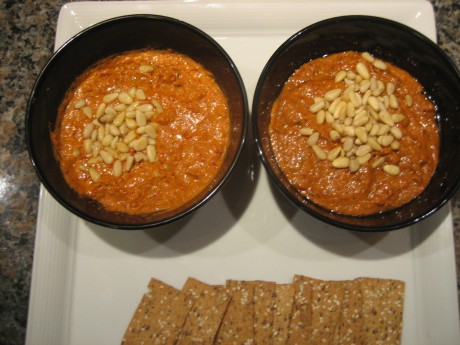
A friend of mine was coming over to watch a movie at my place last night (though we eventually ended up watching another one after all). I decided to have her and DH be the subjects of my experiment. The idea was that I would make a portion of the dip with exactly Anjana’s recipe, and I would make another portion with everything same except 1) the bell peppers would be broiled and peeled, 2) the onions would be roasted and 3) nothing else would be different. And then we would exactly know the difference that roasting would bring to the recipe. Okay, maybe not exactly, since it is a subjective thing, taste, but still, it would be somewhat precise, maybe. (I am going to have deal with this precision question a lot in the years to come!).
Okay, so anyway, that is the setup. And here are the results.
The Results
The sauteed version got done sooner. Now, sometimes, this can be a win in itself. But that is not what this experiment was about. But the taste was oh-so-delicious! This recipe is a keeper in any case (thanks Anjana!).
And then, presently, the other dip was done as well.
First, the look: the roasted version looked a shade darker than the sauteed one.
Then, the smell: the roasted version smelled the same rich EVOO and red pepper smell as the other one. Wait, was this one a little more smoky?
Participant A: No.
Participant B: Yes.
And finally, and most importantly, the taste:
Participant A (paraphrasing): I liked the sauteed one, as it has more of a lighter, fresher flavor to it.
Participant B (paraphrasing): Definitely, the roasted one. It has a rich, smoky flavor that is way better.
What? So are we even? Well, I know, my bad for setting up the experiment without a large, representative, statistically significant sample. But, we need to have a decision, right? I mean, which one do I make when I have guests over the next time? Okay so I decided to cast a vote as well (this was not the time to be the neutral experimenter).
I tasted one, and then the other. And then I had a little more of the the first one. And then a little more of the second. (Okay, yes, I was hungry). And, I agreed with both of their descriptions. The roasted one did have a deeper, smokier flavor while the sauteed one had brighter notes. My verdict is that the sauteed one would work more for outdoor summer parties (or with the lighter Bollywood fare, like our first movie of the night) and the roasted one would be my dip of choice for late fall evenings (in front of dark brooding movies like our second movie of the evening).
There, go figure! Or have your own taste experiment 🙂
Sooji Dhokla
February 7, 2010
One of my good friends is from a Gujarati family, and though she has spent her life in Kuwait, Bombay and the US, she is very well versed with Gujarati culture, language and cuisine. She always used to tell me about the amazing Gujarati food that her Mom used to make in Kuwait while she was growing up. Then, last summer, when her mother was visiting Chicago, I took this opportunity to learn some recipes from her that I have always loved in Gujarati food.
Pallavi Aunty was very kind and so lovingly taught me how to make Patra and Sooji Dhokla. Patra recipe is for another day, but today I am going to tell you how to make the best sooji dhokla in the world.
Making dhokla, is somewhat like baking, in the sense that you are not able to taste and check and tweak it along the away. So once the batter is steaming, the fate of the dhokla has already been decided. Hence it is important that the proportions be exactly maintained or the final product might not turn out to be exactly as you had hoped.
Ingredients
| 1 cup | Sooji |
| 2 cups | Dahi/Curd/Yoghurt (this should be somewhat sour) |
| 2 tbsps | Oil |
| 1 tsp | Salt |
| 1 tbsp | Besan/Chickpea flour |
| 1/2 tsp | Sugar |
| 1/4 | (juice of) Lemon |
| (The sugar and the lemon help in fluffing the dhokla) | |
| 1 heaped tsp | Eno (I found it at the Indian store) |
After this point, the ingredients are to taste and are not precise measurements. Feel free to increase or decrease quantities.
| 2 tsps | Fresh grated Ginger |
| 2 tsps | Minced green chillies (I remove the seeds) |
For tadka/tempering:
| 1 tsp | Rayi/Mustard seeds |
| 1 tsp | Jeera/Cumin seeds |
| 1 tsp | Til/Sesame seeds |
| 7 – 10 | Curry leaves (washed and dried) |
For garnishing:
| 2 tbsps | Dhaniya/Cilantro (washed, dried and chopped) |
Method
Soak sooji and dahi for 2 – 3 hours. I sometimes soak it overnight in the refrigerator, but 1 hour is the absolute minimum.
Mix oil, salt, besan, sugar, lemon juice, grated ginger and minced green chillies into the sooji batter and mix well.
Boil water in a broad vessel.
Grease a steel thali (or a cake pan) that will fit inside the vessel and set it on a stand in the vessel. This is our apparatus for steaming the dhokla.
At this point, you need to work rather swiftly. Put the eno powder in the batter and mix with hand. It will start bubbling and we want to capture this effervescence. Pour the batter into the thali and cover the vessel. I like to wrap the cover with cloth so that the steam will not fall back into the dhokla as water droplets. I also keep a weight on top of some kind to create a better steamer. That is optional though and if your cover is heavy enough, you may not even need it.
Steam it on high for 15 minutes. Do not check in the middle as that will make the steam escape.
When the dhokla is about to be done, you can prepare your tempering. Heat some oil and put the rayi, jeera, til and curry leaves in it till they pop and start to smell fragrant.
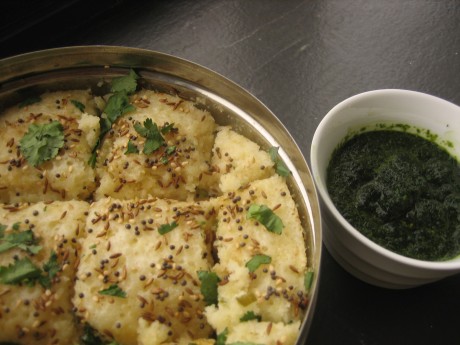
Once the dhokla is done, spread the tempering on the thali and put some fresh chopped cilantro leaves on top.
Serve with green chutney made with dhaniya, ginger and green chillies.
When I first came to the United States as a grad student, my university paired me with a host family who had generously volunteered to help and orient a new foreign student in their city. The Taubes were a wonderful family and I enjoyed learning about the American life through them.
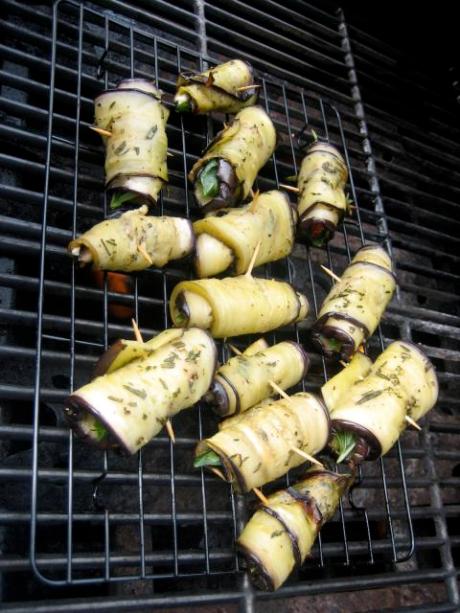
It was at my host family’s place that I had eggplant rollups for the first time. Till then I had only had eggplant, or baingan as we call it in India, in the form of the fire-roasted Bhartha, or the stir-fried Aloo-Baingan. This new dish was a revelation for me as I had never realized that our Baingan Raja could taste so sophisticated, yet earthy at the same time.
Many years later, as I was remembering that wonderful taste, I wrote an email to my hostess and asked her if she could share the recipe with me and here is the recipe that she sent to me. Thanks Michelle! 🙂
“We slice the eggplant length wise about 1/4 inch thick then brush it with olive oil and add garlic and herbs if you like such as rosemary, thyme or oregano. Then put it on a baking sheet and broil it briefly on each side until soft but be careful not to burn. Place a piece of oil packed sundried tomato, a basil leaf and some blue cheese on one end and then roll it up. A toothpick to secure it is optional.”
I sometimes substitute the bleu cheese with goat cheese. Any soft cheese with a strong flavor will do. Also remember to season the eggplant with salt and black pepper before broiling it.
Enjoy!
