Bread baking 101
April 12, 2010
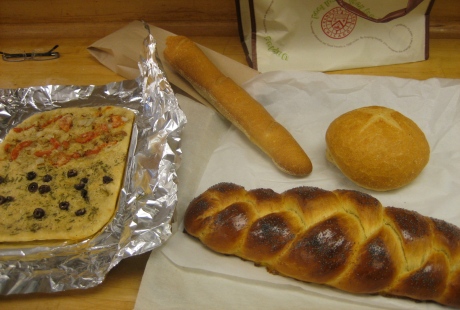
See what I made in my Bread Baking 101 class at the School of Culinary Arts at Kendall college!
There is the focaccia bread on the left, with two different toppings. Right next to it, towards the top of the picture, is the nice crusty baguette (with one end broken off because I had to have it hot and slathered with European butter and could not wait till after I take the picture.) The baguette is followed by the sourdough bread roll, and. finally, at the bottom right, the star of the show, the braided challah bread.
They were all fairly easy to make and taste, oh, so delicious. I am surely going to be making them again at home one by one. I will write up the recipes as I go along, for posterity. In case there is special interest in any particular bread, let me know and I have will have a go at that one first.
A big thanks to S for telling me about this class and for being my very excited class partner.
Vegetable Daliya
April 10, 2010
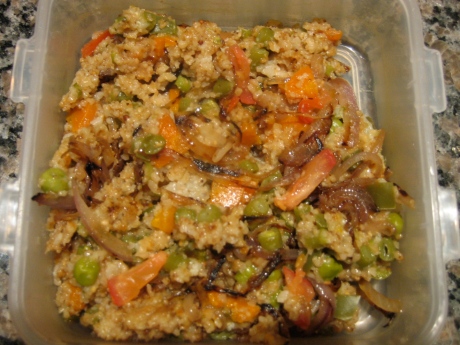
I had a rather “delicate” stomach when I was growing up. And every time I was going through one of the bouts of stomach upsets after eating outside food and/or drink, my mother used to feed me plain khichdi (a mush of rice and daal cooked together) or daliya (broken wheat cereal, which she made sweet with milk). So much so that I started to associate these two dishes with being sick. Then one day for breakfast, at my best friends place in Ludhiana, I had a dish which Aunty called daliya, but it was really different from the sweet milky dish I was used to having. This was savory, full of vegetables and rather dry in form. My eyes were opened and I started to have a new respect for wheat as a grain. I now have vegetable daliya as breakfast, but also as a quick, week night meal.
Ingredients
1 cup broken wheat (daliya) – this is different from bulgur in the sense that it is not pre-cooked. It is available in Indian grocery stores.
2 cups water
Oil
1 tsp cumin seeds (jeera)
one small piece ginger
2 green chillies
For vegetables, I use whatever I have at hand. Pretty much anything that softens in one whistle in the pressure cooker is fair game. This time I used the following.
1 carrot
1 small capsicum/green bell pepper
a handful of green beans
a few florets cauliflower
about 1/4 cup peas
Salt and pepper to taste
Optional:
1 small onion
1 small tomato
Method
Grate ginger and mince green chillies.
Chop all the vegetables (except the onion and tomato) to about an even dice. I keep the cauliflower florets a little bigger as otherwise they tend to turn to mush
Dry roast the daliya till it starts to give off the characteristic wheat aroma. Make sure that you stir it intermittently as otherwise the side touching the pan becomes really dark and starts to taste a little burnt. You want the whole thing to evenly turn a shade or two darker.
Meanwhile, in a pressure cooker, heat a little oil. Add the jeera seeds and once they splutter, add grated ginger and minced green chillies.
Once those brown a little bit, add the diced vegetables and stir for a few minutes.
Add the roasted daliya and water and salt. You can also add black pepper if you so wish though I didn’t as I had put enough green chillies for my taste.
Close the pressure cooker and heat till the pressure develops. At this point, reduce the heat to low and cook in pressure for ten minutes.
While this is cooking, you could carmelize some thin sliced onions in very little oil. Make sure you don’t stir the onions too much while caramelizing them so that they brown ‘attractively’. I usually like to add onion and tomatoes on top if I am making the daliya for dinner, to add a rich earthy flavor, but not if it is for breakfast, as then I like the lighter version.
When you open the pressure cooker, gently fluff the daliya and spread the caramelized onions on top.
In the same pan that you caramelized the onions, you may quickly heat some diced tomatoes, not to cook them, but just till they are barely hot and spread them over the daliya as well. If you don’t want to add tomatoes, a squeeze of lemon would be a good addition as well.
Serve hot and enjoy!
Mathri
April 9, 2010
The thought of mathri transports me to the halls and laws on Sarojini Bhawan where my girlfriends and I spent many winter afternoons lounging about and feasting on the mathri and achaar sent by one sweet mom or another. That, along with Mahesh Ji’s chai, highly sweet and kadi, the kind I would not drink today, were the stuff our sun-touched days were made of. We all treasure those memories so much that even our e-group is called mathri-achaar!
Then, after I got married to this guy from Rajasthan, I got to taste the savory heaven that is MIL’s mathri. Whenever she is visiting, she makes a small batch, despite my loud protestations of not wanting to eat deep-fried foods, but then somehow, that small batch vanishes surprisingly fast at the hands of DH and yours truly. MIL only smiles knowingly.
So when Pink God posted a recipe from Nani ji for making mathri, I could not resist and wanted to make some too. But I also wanted the taste that MIL’s mathri has. So I called MIL and followed her recipe instead (which is fairly close to what Anjana posted with small differences)
Ingredients
3/4 cup whole wheat flour
1/2 cup maida (all purpose flour)
1/4 cup sooji (semolina)
1/4 cup ghee (clarified butter)
about a 1/4 cup warm water for dough
salt to taste
1/2 tsp ajwain (carom seeds)
Oil for frying
Method
In a parat (wide, deep plate), mix all the flours, salt and ajwain.
Heat the ghee a little bit if it is solid and then add it to the parat.
Rub this mixture with your hands for a good ten to fifteen minutes. The fat should be very well incorporated with the flour. This step is very important as this is what makes the mathri khasta, or flakey.
Make dough with a small amount of lukewarm water. The dough should not be soft.
Divide the dough into small balls, and using your rolling pin (belan), roll out small roundels.
With a fork, pierce each roundel multiple times. This ensure that the mathris will not puff when you fry them in oil. I think if the dough is really tight, that should anyway not happen, but I did this step anyway.
Heat oil and reduce the heat to medium low. Fry the mathris in batches of 5 or 6. Do not overcrowd them in the pan. Also, frying on medium low is very important. You don’t want to fry the mathris on high heat as then they will quickly brown on the outside but will not be cooked from the inside.
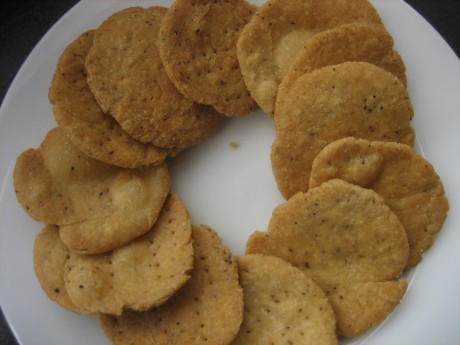
For me each batch of mathri took about 8 to 10 minutes and my mathris did not change color too much. These were dark initially because of the partial use of whole wheat flour instead of maida. If you want to further darken them, then you could use Anjana’s technique of raising the temperature of the oil towards the end and then bringing it down before putting in the next batch. With my glass top cooking surface, I am not able to quickly change the temperature so I did not do that. I also liked the color that my mathris came out to be in any case so it worked out.
The resulting mathris were approved by DH who is a mathri purist and used to only like the ones that his Mom made. We enjoyed them with home made lemon and mango pickles. There is something about mathri-achaar, I tell ya… 🙂


